
Article: How to Clean Guitar Fretboard
How to Clean Guitar Fretboard
When I work on a guitar in my shop, one of the best ways to know if the instrument is cared for is the condition of the fretboard. It’s not difficult to maintain, but the signs are pretty obvious when there’s neglect, and it can get pretty gross! Regular cleaning of your fretboard removes grime and sweat, reducing corrosion of your frets and dead skin cell buildup, “fret cheese”. In this post, I’ll focus on one area in particular: the proper way to clean a guitar fretboard. By cleaning guitar frets and the fretboard correctly, you’ll not only improve your guitar’s look and feel, but also ensure your instrument stays healthy for years. It’s a simple task that many guitar players overlook, but it can make a big difference in your guitar playing experience and reduce judgments by your tech the next time you bring your guitar in for a setup.

How to Clean Guitar Fretboard
In this guide, I’m going to walk you through how to clean a guitar fretboard properly, from my experience working in a boutique guitar manufacturing shop and also my own pickup and tech business. First, we’ll cover what a fretboard is and why it’s important to maintain. Next, I’ll list out what to use to clean a guitar fretboard and the tools and products you might need. Finally, we’ll dive into a step-by-step section on how do you clean a guitar fretboard safely and effectively. Whether you play acoustic or electric guitars, finally, a post will be informative and helpful for everyone! By the end, you’ll have a nicely cleaned fretboard and a guitar that feels great to play. Let’s get started!

What Is A Fretboard On A Guitar?
The fretboard (also called the fingerboard) is the front-facing surface of the guitar’s neck. It’s usually a slightly curved piece of wood where the metal (nickel of stainless steel) guitar frets are embedded. When you press a string down against the fretboard behind a fret, you shorten the vibrating length of the string, which produces a higher-pitched note. In short, the fretboard is where all the action happens: it’s where your fingers press to create every chord or melody. Because your fingers (and natural skin oils and sweat) constantly contact it, the fretboard can accumulate dirt and gunk over time. Keeping it clean not only makes it look nice and feel smooth, but if your fretboard wood isn’t sealed, we need to make sure that wood doesn’t dry out and get damaged.

What to Use to Clean A Guitar Fretboard
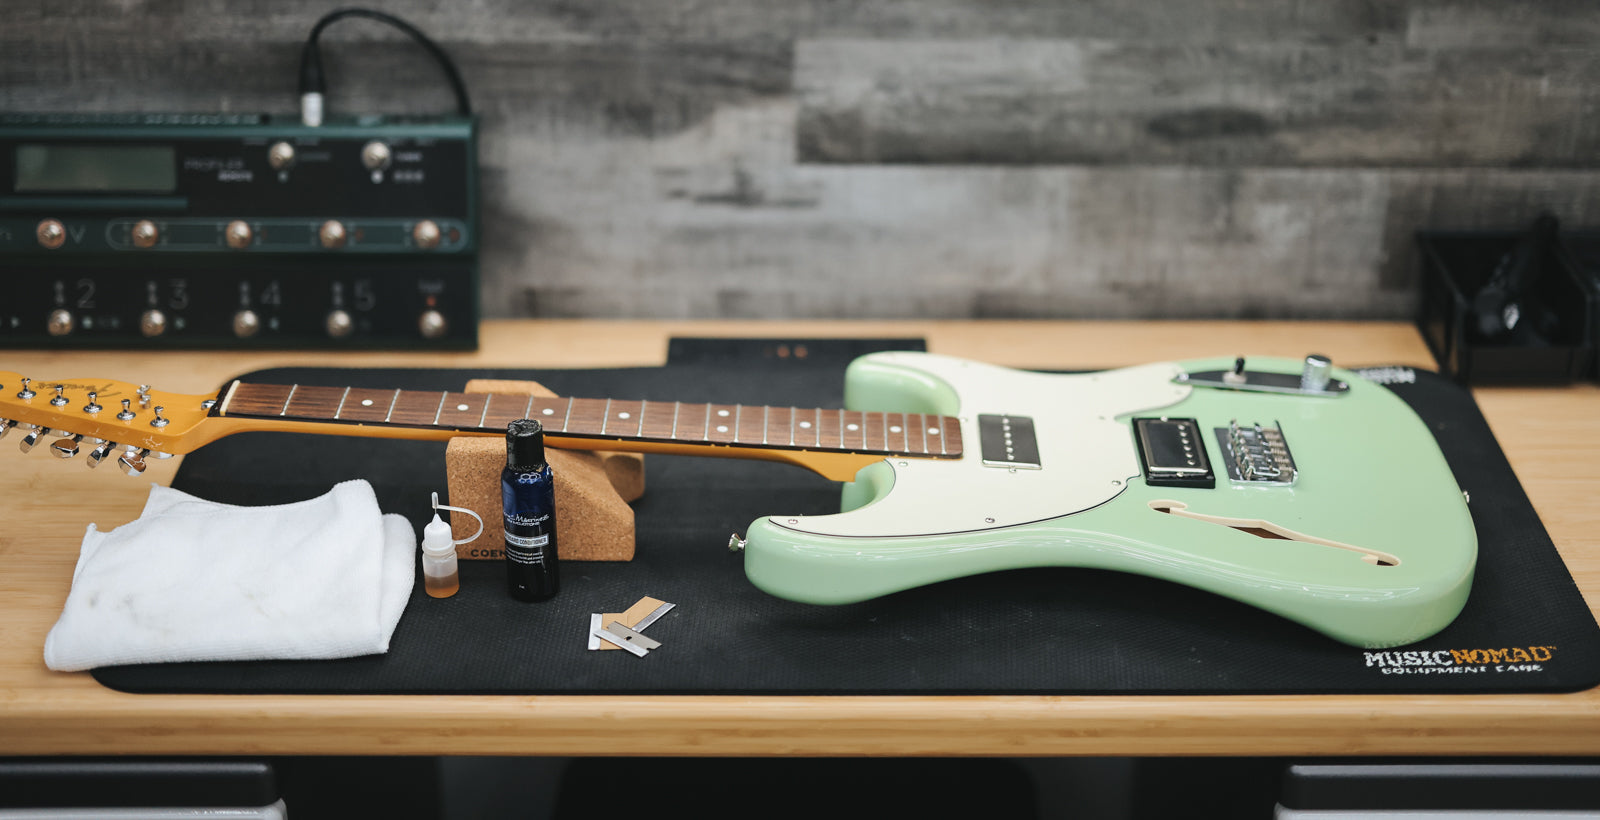
Before we start cleaning, let’s gather the supplies and tools you’ll need. I’m going to show you my process, not necessarily the most economic way to do this, since I do it professionally - but it’ll still be with tools like a lot of you likely already have or have access to. Btw, don’t use tools/materials/products on your guitar without a reason. We’re taking a “restorative” approach to fretboard cleaning and we want to avoid any damage that requires repair work to be done. Here’s what you should have on hand to clean the fretboard:
-
Soft cloths (microfiber or cotton) - One for wiping off grime, and another for applying the conditioner.
-
Guitar fretboard cleaner and/or conditioner - Look for an instrument specific product, not household commercial grade as those usually have harsh chemicals and abrasives that can hurt your guitar. A lot of tech’s and luthier’s recommend lemon oil for unfinished fretboards like rosewood, ebony, pau ferro, etc.
-
Dremel rotary hand drill and red jeweler's rouge polishing compound - This saves SO much time and, if used carefully, gives a beautiful fret polished finish.
-
Fretboard guards - These guys allow you to protect the fretboard while you polish your frets. A must if you’re using a Dremel-like tool for the polishing and want to avoid taping down your entire fretboard.
-
Razor blades - I use single-edge razor blades to scrape the fretboard of all the gunk buildup before we apply the conditioner.
-
Masking tape - There is fancy fretboard tape out there, but it’s pretty expensive. You can use painters' tape as it will not leave a residue behind, which is crucial, but if you can spring for the fretboard-specific tape, I would, since it’s thicker than painters' tape and will reduce your chances of gouging the fretboard if you slip with the Dremel.
-
Tooth brush - Useful for getting the gunk from the edges and corners of your frets after doing a good scraping.
-
New strings! - Give your baby a fresh set of strings while you’re at it, and if you’re not sure your guitar deserves new strings yet, go check out our blog post about how often you should change your guitar strings for more info.
-
Stable workbench w/neck rest - Perhaps the most important is a safe workspace to perform this procedure. A kitchen table is fine, but please do due diligence by putting down a thick blanket and having a neck rest of some kind so your guitar isn’t sliding around or tipping back and forth as you apply pressure to the frets. I prefer a foam pad under the guitar (kind like a yoga mat for the axe) and a cork neck rest to keep my work space cushioned, tidy, and secure.
There are many ways to do this, but I’m going to show you how I do it. If you find another method that works for you, do it! The whole point of this is to encourage you to learn more about your instrument and help you play just a few more chords this week.

Wait a minute, what about those maple fretboards or other finished necks? Should I be cleaning and polishing those, too? If your fretboard is maple and has a clear coat finish on it (common on many Fender electric guitars, for example), you should not oil or condition it. Maple boards typically just need a wipe with a slightly damp cloth (or a gentle guitar polish) and then a dry wipe. They don’t absorb oil because of the finish, and they usually don’t accumulate the same kind of open-pore grime. Just keep them clean and dry. For all other wood types (rosewood, ebony, etc.), a light oiling or conditioner application during a deep clean is great. It cleans, conditions, and can make the fretboard look richer in color.
How Do You Clean A Guitar Fretboard?
Here’s my step-by-step process for cleaning your guitar’s fretboard. This method works for guitars with unfinished fretboards, such as rosewood, ebony, or pau ferro. If you have a finished maple fretboard, I’ll note some differences along the way. Take your time with each step – cleaning a fretboard isn’t hard, but a little patience goes a long way towards doing it right.

Step 1: Remove the Strings (and Prepare the Guitar)
Loosening and removing the guitar strings gives you full access to the fretboard for cleaning.
You can either loosen them and take them off one by one, or carefully cut them (if you’re planning to discard the old strings anyway). Removing all the strings might feel strange if you’ve never done it, but don’t worry – it won’t hurt your guitar neck. Wood is resilient and has “memory,” so taking all the tension off briefly is fine (luthiers do it all the time).
Step 2: Dry Wipe the Fretboard to Remove Loose Dirt
Use a soft cloth to remove dust and loose grime from the fretboard surface.
With the strings out of the way, start by giving the fretboard a good dry wipe. Take a clean, dry microfiber cloth or an old cotton T-shirt rag and run it along the fretboard, rubbing in between each fret. This will pick up most of the dust, dried sweat, and loose debris. Often, a simple dry wipe will already remove a lot of the grime on the surface.


Step 3 (Optional): Razor Blade Scraping to the Fretboard
Use a razor blade perpendicular to the fretboard to scrape away the cheese.
If you notice gunk buildup or a variation in color or obvious “high-use” fret areas vs others, it might be time to clean up the fretboard cheese. Lightly scrape alongside each fret to peel up the gunk of dead skin, dirt, sweat, etc that's been pressed into the unfinished wood's surface. Be VERY careful with the razor blade, placing it against the fret edge at exactly 90 degrees perpendicular to the fretboard and scraping back and forth between the fret slots. Doing this will remove a fine layer of buildup and, if you do it right, won’t leave any marks or lacerations on the fretboard's surface. You’ll get a TON of junk off there, so use a vacuum or cloth to wipe away the stuff you scraped off and then grab that toothbrush to get the tiny specs out of the edges of the frets as well.

(Pro tip: If the fretboard is only mildly dirty, a dry or slightly damp cloth might be all you need for this time. Avoid using excess water or any household cleaners; a fretboard cleaner product or a dab of water is safer for the wood.)

Step 4: Deep Clean and Condition the Fretboard (Use Oil or Cleaner/Conditioner)
Apply a few drops of lemon oil (fretboard conditioning oil) and rub it into the fretboard to hydrate the wood.
Now that the loose dirt is gone, it’s time to clean and hydrate this clean and beautiful organic surface. This is where your lemon oil or fretboard conditioner comes in. Most guitars with dark fretboards (like rosewood, ebony, pau ferro) benefit from occasional oiling. The oil acts as a gentle cleaner and also re-moisturizes the wood, preventing it from drying out and cracking. In my opinion, this should not be done more than twice a year unless you live in an extremely dry environment. Overconditioning your fretboard is possible, so think of it as a once or twice a year spa treatment when using oil/conditioner.
Apply a small amount of your chosen fretboard cleaner or oil to the board. Most say to apply it to a cloth first, but I drizzle a little along the fretboard since I know about how much I need for this particular project. You do not need much; a little goes a long way.

Grab your clean microfiber or cotton rag and spread out the oil so it completely covers the frets. Once you’ve worked the oil or conditioner across the fretboard, wipe any excess off and then let it sit for 10 or 15 minutes. This will allow it to start absorbing into the wood, especially if it was really dry. Then take a clean, dry cloth and wipe any remaining oil or conditioner residue off the fretboard, as any wet areas will just attract more dirt and dust to create buildup that we just removed in the first place.

Your fretboard should now look refreshed, clean, and ready for a fresh set of strings!

Step 5 (Optional): Polish the Frets and Final Buff
It’s time for some POWER TOOLS! Yes!
My favorite part of a full setup is polishing the frets to a brilliant shine. Obviously, sometimes it takes more work to get them in good shape again if they’re uneven or sprouting, etc. BUT, for this example, we’re assuming the frets are in good working order, but have seen some use. Let's make them shiny again!
Grab your Dremel tool, a cloth polishing pad, and the red jeweler’s rouge, and let's get to work! This is where you could use that masking tape to cover the entire fretboard, leaving only the frets exposed. If I had done additional fretwork like leveling, crowing, etc, then I’d have tape on there for that anyways, and you’d just polish the frets before removing the masking tape, but if you’re just polishing, you can use the fretboard guards and get’er done.

Choose the correct fretboard guard that allows the entire fret to slip into the slot. Next, turn on your Dremel tool and allow the wheel to absorb some of the red rouge (wear safety glasses here, as the polish tends to fly off if it’s spinning at a high rpm). With one hand holding the fretboard guard in place and the other hand supporting the Dremel tool, run it back and forth across the fret. I tend to spend about 10 seconds of light to medium light pressure polishing per fret. Move onto the next fret and repeat! Every 4-5 frets, add some more red jeweler’s rouge to the polishing wheel and continue all the way up the fretboard.

You may notice that the polishing compound looks very dark on the frets… what have you done!?! Just kidding, that’s perfectly normal, and now that all of your frets look dark and grimy, it’s time to grab another clean cloth and wipe off the compound sitting on the frets. What you reveal underneath is a beautifully shiny and clean nickel or stainless steel fret surface.

Grab that cloth you used to wipe the excess oil/conditioner off and do a dry wipe of the entire fretboard surface to get any fragments of polishing compound left from the polishing wheel, and you’re done! Ready for new strings and a final setup.

With the guitar re-strung, play a few chords and notes. Bends and slides should feel easier now that you’ve cleaned the fretboard and polished the frets. Beyond the feel, you’ve also helped your guitar’s longevity; a clean, conditioned fretboard is less prone to drying out or developing warping/twisting issues. (Remember, dirt and sweat can actually harm the wood and even corrode frets over long periods of time. You’ve prevented that by doing this maintenance.)
Cleaning the fretboard is something you don’t need to do extremely often, once or twice a year for most, or whenever you notice it’s visibly grimy or feeling sticky. A quick wipe with a cloth after each playing session will delay how often you need deep cleans. But whenever it’s time, you now know exactly how to clean a guitar fretboard step by step. It’s a simple part of guitar care that keeps your instrument in top shape both visually and functionally.

Conclusion: By taking care of your fretboard, you ensure a smooth playing experience and protect your guitar’s neck. A little preventative care (washing hands before playing, wiping down the strings and fretboard regularly) goes a long way, but eventually every guitar needs a good fretboard cleaning and conditioning. Now you have the knowledge to do it properly without harming your guitar. So go ahead and enjoy that fresh, like-new feel of your clean fretboard. Your fingers (and your guitar) will thank you, and your next session will feel fantastic. Happy playing and love your tone!
Written by Kurtis Lamberton

Leave a comment
This site is protected by hCaptcha and the hCaptcha Privacy Policy and Terms of Service apply.